

Welcome to the June Creation Station Blog Hop! We are a group of Stampin' Up! Demonstrators from around the world who hop every first Sunday of the month. Our theme this month is Unique Folds. Whether you've hopped in from our fantastic new design team member Martin Stone's blog or you are starting out here, I'm happy you stopped by. You're bound to get a lot of inspiration this month, so be sure and click on the "Next" button at the end of each post to see each of the designer's projects.
Several month's ago, I saw a "double-fold" card created by Robin Shakor who is a project designer for another paper crafting company. I looked at her design and thought it would work well with our Memories & More card packs--so I kept her idea in the back of my mind as a possible project for this hop. Then the new Annual Catalog pre-order happened and I bought all of the Come Sail Away Suite, including the new Memories & More cards. The double fold card turned into a double fold cover on a waterfall mini album:

This mini album was going to be a surprise for my husband for Father's Day. However, after searching frantically for my photos of our adventures on Vahevala, I had to give up and ask him if he knew where I could find them. A three-day search through 3 computers, numerous CDs and a couple of thumb drives yielded only a few, not so exciting photos. So, the surprise will happen when (not if) I find the photos in my box of printed photos. (Hey, I had a flip phone back then!!!).
Here's my special creation for my Captain, sans pictures:

The album is 8" high, by 5" wide by 1/2" thick. The extra thickness is to accommodate photos. I designed the size of the album around the 4" x 6" Memories & More cards and the standard size of printed photos. I can use the full size photos this way and also crop them as needed.
Here's the double fold front feature. It opens from the left.

*Please note: I believe it is important to hand write all my journaling.


The large photo frame on the left is for a photo of Vahevala with sails up and sailing on Lake Martin, Alabama. (I took a series of those--so I know I will find it!). Here is a close up of the waterfall photo feature:

For those of you who are interested in how I made this album, here is the step-by-step (if you're not interested, just scroll on down to the "Next" button--this is a long post!):
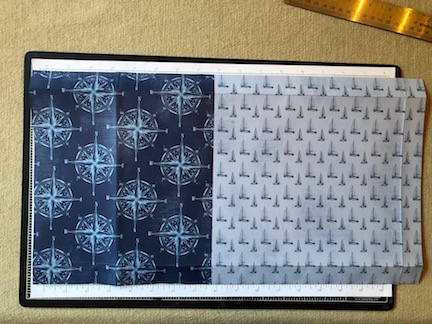
I started with one 10" high by 12" wide piece of designer series paper (the sail boat pattern) and one 10" high by 9-1/4" wide piece (the compass pattern). I overlapped the compass pattern 2" on the left hand side (when looking from the outside cover side). You need to be sure and check the orientation of your paper to make sure you don't have any upside down patterns. Next you will turn your entire sheet over and score on three sides. In the above photo, the un-scored side is on the left-hand side of the photo. This will be the side that wraps around to the front of the mini album.

On the inside of the album, you will place chipboard: 2 pieces 8" x 5" (side pieces), 2 pieces 8" x 1/2" spines) and one piece 8" x 2" ( the front flap piece). Line up the first side piece along the left-hand score line, then add each piece leaving a bit less than 1/8" gap. Glue the pieces down with Multipurpose Liquid Adhesive.

Next miter your edges as shown and add Tear and Tape adhesive as shown.

Close-up of flap edge cut.

Fold paper edges over chipboard and go over with a Bone folder. The paper edges on the flap end should be glued down before adding Tear & Tape as shown. Fold the flap end down over the chipboard and go over it with a bone folder.

Cut a piece of designer series paper (this one is the Lighthouse pattern) to 7-3/4" high by 10-1/2" wide. Again, check your paper orientation. Adhere to inside with Multipurpose Liquid adhesive. Next, take your bone folder and carefully score along the gaps between the chipboard pieces. Carefully fold the book along the score lines.

To create the waterfall, cut 6 pieces of Whisper White card stock to 6-1/2" X 4-1/4" Score at 1/4" along the top side. I decided to use various patterns from the Come Sail Away designer series paper to cover the fronts of each of my cards (except the top one where I added a Memories & More card). I cut them at 6-1/4" x 4-1/4" and adhered them with Multipurpose Liquid Adhesive. They will serve as frames for the photos. (Once I decide on the photos I will be placing in the album, I may cover the back sides as well.) After you finish covering your cards, use a bone folder to fold the flap back at the score line. Add Tear & Tape adhesive to the back of the flap on each card piece. Adhere your top card flap about 1/4" from the top of the album side. Add each additional piece with the folded side against the bottom of the flap edge of the card just above it.
Add a 4-1/4" x 6-1/4" piece of card stock to the other side of album to use as a frame for the main photo of your album.
For the folded piece on the cover of the album (see above), cut a piece of Night of Navy card stock 8-1/2" wide by 6-1/4" high. Score at 4-1/4". Add your Memories & More cards to the inside and journal as desired. I used a piece of the newspaper print pattern paper cut to 4" x 6" for the right-hand side of my piece. Then I used sticker from the card pack, "Here's to making every moment count", and backed it with a piece of Night of Navy card stock that I trimmed to fit around the sticker using the Modern Label punch.

Add a 16" piece of ribbon to the center of the flap as shown, using Tear & Tape adhesive. I used the linen ribbon in the Magnolia Land ribbon combo pack.
Place several strips of Tear & Tape on the bottom fold side of the cover piece. Remember that this piece will open from the left-hand side, so check the orientation of the cards in the center to make sure you do not put them on upside down. Also, only about 1-/14" of the piece will be adhered to the flap side.

Once you have your cover piece adhered to the flap, adhere a 10" piece of ribbon to the front of the piece as shown.

Lastly, add the Memories & More card to the cover of your top piece, using Tear & Tape adhesive to secure the ribbon. I used a 4" x 6" piece of Balmy Blue card stock, embossed with the Subtle 3D embossing folder. On top I adhered a laser cut card from the Come Sail Away Memories & More pack. I added a greeting from the Sailing Home stamp set, heat embossed in white on Night of Navy card stock, and a stamped sailboat. Both were die cut using the Smooth Sailing dies.
This was such a fun project to create, made easier with the Come Sail Away product suite and especially the Come Sail Away Memories & More card pack.
Now it's time to be inspired by Tanya Bell!

Thanks for stopping by!--Sara Nell, First Mate


This is an awesome project! I love all the Come Sail Away papers in the new catalog!
ReplyDeleteThanks for the step by step pictures, so useful! Your idea is simply wonderful Sara!
ReplyDeleteLove this little album. Will have to try making one. Thanks for the directions!
ReplyDelete