Welcome to the Creation Station Blog Hop for March. We are sharing projects created with ink blending techniques this month. You'll find plenty of inspiration for your next projects today, so be sure and hop along with us by clicking on the "Next" link at the end of each of our posts.
Two totally different projects in the photo, right? The first one is really vintage and the second one is more modern. They use the same stamp set, Ranunculus Romance (#157968) and coordinating die set, Ranunculus dies (#157976), and incorporate ink blending in different ways. I am a big fan of ink blending and love our Blending Brushes (large, #153611; small, #160518) to help me create great ink blending projects.
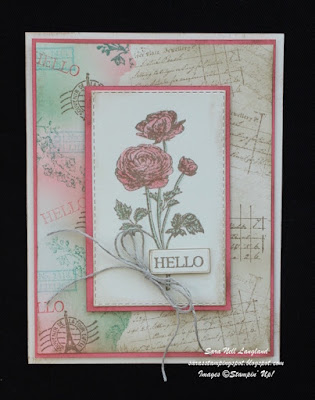
The Ranunculus Romance stamp set has a definite vintage feel, so I used Very Vanilla card stock and a faux layering technique to carry that vintage feel into this card.
To create the faux layering, you first tear a piece of typing paper in half and use both halves to mask one side of the card piece as you work on the other side. I first masked off the right-hand side of the card. I used my Blending Brushes to blend together Flirty Flamingo, Balmy Blue and Mint Macaron inks onto the left-hand side of the card stock. Next I stamped different images from the stamp set onto the blended colors using the same three colors and Crumb Cake inks. Once this was done, I blended Crumb Cake ink all over the front and edges of the card stock. Next, I masked the left-hand side of the card piece and stamped the right-hand side with the ledger image from the stamp set using 1st, 2nd and 3rd generation stamping with Crumb Cake ink.
The top layer of the card is the ranunculus image stamped in Crumb Cake ink and colored with Mint Macaron and Flirty Flamingo Stampin' Blends. It was die cut using a Stitched Rectangles die (#151820). The Hello greeting from the stamp set was stamped in Soft Suede and die cut using the coordinating die from the Ranunculus Dies set.
The edges of each of the layers were hit with a Blending Brush and Crumb Cake ink before the card was assembled. A double bow of Linen Thread (#104199) completes the card.
To create the more modern look, I used a Basic White note card and Basic White card stock. I updated the colors I used to Sweet Sorbet, Tahitian Tide, Parakeet Party, and Tuxedo Black. I used my Blending Brushes to blend my colors in loose stripes. If you look closely you'll see a bit of orange and a bit of purple where the Sweet Sorbet blends into the other two colors. The background is a Sweet Sorbet pattern from the Country Gingham designer series paper pack (#160388). A few 2022-2024 Matte Decorative Dots in Sweet Sorbet complete this card.
Next up is Vicki Boucher. I can't wait to see the ink blending techniques she has used on her projects!
Have a great week!
--Sara Nell


What a great idea to stamp in black over top of this beautiful, colourful background.
ReplyDelete