Sunday, September 4, 2022

Creation Station September Hop--Gold!


Welcome to the Creation Station Design Team Hop!  We're sharing "Gold" projects today.  Be sure and click on the Next Link at the end of each blog post to hop to each team member's projects. They are going to be fabulous.


For this "Gold" hop, I have paired gold embossing, Gold Brushed Metallic Card Stock (#153524) and gold embellishments with the Rustic Harvest Suite (#159648).  Each card features a different piece of Rustic Harvest designer series paper (#159633) layered over a piece of Gold Brushed Metallic card stock and a Basic Black card base (#124267, 12" x 12" card stock pack).


On this first card, the pumpkin from the Hello Harvest stamp set (#159634; bundled with the Rustic Pumpkin Dies at 10% off, #159644) was stamped in VersaMark ink (#102283) on a Cajun Craze pattern from the Rustic Harvest paper, heat embossed with Gold Stampin' Emboss Powder (Metallics Collection, #155555), and die cut with a Rustic Pumpkins die (#159643).  This die set was also used to die cut the second pumpkin and the pumpkin vines out of the Gold Brushed Metallic card stock.  The floral image from the stamp set, was stamped in VersaMark ink, heat embossed with gold, and colored with the following Stampin' Blends combos:  Cherry Cobbler, Cajun Craze, Daffodil Delight, Orchid Oasis, Pale Papaya, Old Olive and Mossy Meadow; then die cut.  The greeting was also stamped in VersaMark and heat embossed in gold on Basic Black.  It was die cut using a label die from the Harvest dies (#156504).  


The background layer was dry embossed using the Timber 3D embossing folder (#156406).  (Tip:  when I dry emboss larger sized pieces of designer series paper, I usually adhere the paper to a piece of card stock so the paper isn't torn through in places as it is embossed.  I also think it brings out more detail from the embossing folder when I do this.)  This card was finished with gold Brushed Metallic Adhesive-Backed Dots (#156506).


This card shows off the beautiful mum floral pattern from the Rustic Harvest papers.  To create the greeting banner, I used the Thanks & Hello embossing folders (#135430).  I cut a 4" x 1-1/4" piece of Basic Black card stock then placed it carefully inside the Thanks embossing folder after I had lightly sponge-brayered VersaMark ink over the inside top of the folder (the side with the Stampin' Up! logo).  The line printed at the top of the folder helped to keep the card stock straight in the folder.  I did rub the card stock strip with the Embossing Buddy (from the Embossing Additions tool Kit, #159971) before placing it in the folder.  After the strip was embossed, I covered it with Gold Stampin' Emboss powder and heat embossed it using the Heat Tool (#129053).  Once dry and heat embossed, I layered the strip over a piece of Gold Brushed Metallic card stock.  A few Brushed Brass Butterflies (158136) were added to complete the card.


After creating these cards, I'm ready for Fall and for the leaves to start turning.  Are you?  Now lets head over to Yvonne's Blog, The Creative Tea Cup, and see how she has celebrated Gold in her projects:


Have a wonderful September!
--Sara Nell


Sunday, August 7, 2022

August Creation Station Blog Hop--Anything Embossing


Welcome to the August Creation Station Blog Hop!

So glad you have joined us this month as we share our favorite embossing techniques and tips with you. Be sure you click on the "Next" link at the end of each blog post so you can see all of our projects.

Today I have two cards and am sharing three different embossing techniques and tips with you:


The first card was created using the Nature's Prints Bundle (#158801), which includes the Nature's Prints stamp set (#158793) and the Natural Prints dies (#158800).  On this card I used one of my favorite heat embossing techniques: combining Stampin' Emboss Powders to create a unique look with a bit more depth than embossing with just one color gives you:


The focal image was stamped in Versamark ink (#102283) and then heat embossed  with a combination of White and Clear Stampin' Emboss Powders (Basics Collection, #155554) and Silver Stampin' Emboss Powder (Metallics Collection, #155555).  I usually test an embossing powder combo and remix before finalizing my image.  I started out with a silver and clear combo I already had on hand but this image needed the addition of the white to make it really stand out on the card. 

The embossed piece was die cut and then arranged over three stems die cut from a foil color in the Silver Foil specialty pack (#156457, this specialty foil pack is  available until August 31 as a FREE Sale-a-Bration product choice with a minimum $50 purchase using the SAB code #163096).   The background is a piece of Sun Prints designer series paper (#158790), layered over a piece of Starry Sky card stock.  The card base is a Basic White notecard (#159232). 

The greeting was stamped in Starry Sky and then in VersaMark and embossed with Clear Stampin' Emboss Powder.  I used the Stamparatus (#146276) to easily align the double stamped image.  Our classic Stampin' Inks dry too fast to add embossing powder to the image without the addition of the VersaMark ink on the image.   The greeting was die cut using the frame die in the Natural Prints Dies.
Pearl Basic Jewels (#144219) complete the card.

The second card was created using the Botanical Layers Bundle (#158920).  This is a unique bundle as it includes the Botanical Layers stamp set and the Lovely Layers Vellum pack (#158919).   


This card was inspired by one of the printed vellum pieces.  I wanted to recreate the design in color and created it on another pattern in the vellum pack:


You cannot stamp on vellum with our classic inks without embossing the images with clear embossing powder because vellum is non-porous, meaning that it will not absorb the ink so it can dry.  Since the ink does not dry, you can add the embossing powder right over the ink without using VersaMark.  My process for creating the card was to stamp all the images using one color, cover them with Clear Stampin' Emboss Powder and heat emboss, then stamping with the next color.  I used the low setting on the Heat Tool (#129053) so that the vellum would not curl so much.  I stamped the larger images first, then added the smaller ones.  Ink colors used:  Parakeet Party, Garden Green, Tahitian Tide, Fresh Freesia, Orchid Oasis, Pale Papaya and Sweet Sorbet.  The stamped and embossed vellum piece was layered over a piece of Basic White card stock, then over Orchid Oasis card stock.  The card base is Basic White Thick card stock. 

The greeting was stamped in Orchid Oasis and then die cut with a Stylish Shapes banner die (#159183).  Starry Sky and Tahitian Tide 2022-24 In Color Matte Decorative Dots (#159186) complete the card.

I hope I've inspired you to try some new ideas with your heat embossing.  Now let's head over the Vicki Boucher's blog to see her embossed creations.  She is a very talented member of Stampin' Up!'s Artisan Team this year, so I am so excited to see what she is sharing with us.


Have a wonderful week!
--Sara Nell 


Thursday, August 4, 2022

Teacher's Treats--#tgifc379

The TGIF Challenges team has challenged us to focus on Back to School.  My first step for this challenge was to check with my daughter.  My 3-year-old grandson is returning to his day care/school in a couple of weeks after spending his summer home with his dad, who is set to return to his teaching job.  Katharine and I decided that it would be nice to give Easton's two teachers a little chocolate treat as they welcome Easton back to his classroom and help him get used to the school routine again.  If it was up to Easton, these treat bags would be all about dinosaurs.  However, I thought the teachers would rather have something pretty:


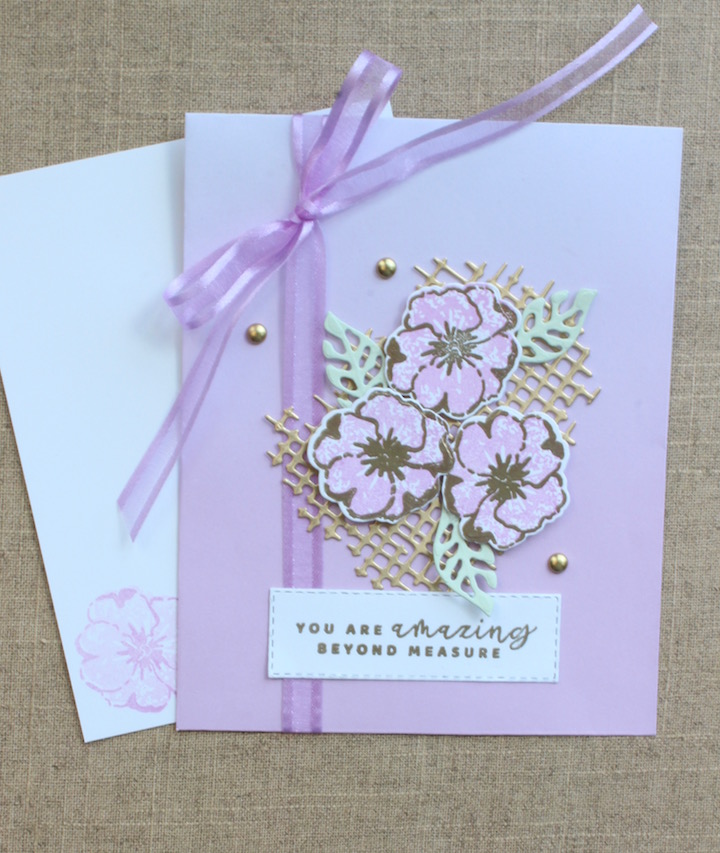
I pulled out two retired Ombre Gift Bags--one in Fresh Freesia and one in Polished Pink for the treat bags.  I decorated them using my new favorite and already well-used Season of Chic Bundle (#158816), which includes the Season of Chic stamp set (#158810) and the Chic Dies (#158815).  The netting die was used to create the background for the flowers out of Brushed Metallic card stock (#153524).  This card stock is now a FREE Sale-a-Bration product choice with a minimum $50 purchase using the SAB Item #163103. 


I used the two-step stampin' flower images to create the flowers on each card.  The flower base image was stamped in the color of the bag (Fresh Freesia or Polished Pink). The flower outline image was stamped in VersaMark ink (#102283) and then heat embossed with Gold Stampin' Emboss Powder (Metallics Collection, #155555).  The leaves were die cut out of Soft Sea Foam card stock.  The greeting was also stamped with VersaMark and heat embossed with gold.  It was die cut using the Stitched Rectangles dies (#151820). 
 

The bags were finished with Brushed Metallic adhesive backed dots (#156506) and tied closed with Open Weave ribbon:  Fresh Freesia (#155615) and Polished Pink (#155714).  Inside each bag is a 5-1/2" x 4-1/4" Basic White card stamped with a two-step flower.  This card is for Easton to "sign".  And, just because something couldn't be from Easton without a dinosaur, it will also be stamped with a coordinating dinosaur image from the retired Dino Days stamp set.  

I misplaced the Dino Days stamp set after making a 4th of July card for Easton,  so I couldn't stamp the dinosaur image for this challenge.   I'll have to find it hidden among the chaos that is my stamping room while I am decluttering and reorganizing.   This process is taking me a very long time!  But that stamp set is around here somewhere.  I'll find it again before I have to mail the treat bags for Katharine to fill with chocolate.

Find more Back to School Ideas over at the TGIF Challenges Blog here. 


Have a great day!
--Sara Nell


Wednesday, July 27, 2022

Oak Leaves for a Birthday--#tgifc378

We are to share our favorites in our projects for TGIF Challenges's Inspiration Challenge this week.  Now favorites could mean any kind of favorite.  I chose my favorite images to stamp:  Leaves.  (But, of course, you already knew that unless you are new to my blog.)  I think I can also say that my favorite new stuff from the Annual Catalog is the entire Texture Chic Suite (#158819)  This card now completes my stamping of every image in the Season of Chic stamp set (#158810, bundled with the Chic dies at 10% off, #158816).  I have really been having fun with all these products.  Here are the oak leaf stamped images and die cuts from the suite incorporated into a birthday card:


The background is a piece of the Texture Chic specialty designer series paper (#158808) layered with a gold dotted piece from the Sale-a-Bration Silver & Gold specialty 6" x 6" paper pack (#159941, FREE with a minimum $50 purchase during the July-August 2022 Sale-a-Bration).  The two-step stamping oak leaves were stamped in Mango Melody and Soft Succulent and Evening Evergreen.  The gold leaves were die cut out of Distressed Gold specialty paper.  The Chic dies set (#158816) was used to die cut all of the leaves.

The greeting was stamped in VersaMark ink (#102283) on Soft Succulent card stock and heat embossed with Gold Stampin' Emboss Powder (Metallics Collection, #155555).  It was die cut using a Stitched Rectangles die (#151820).

A Basic White Thick card base, a layer of Mango Melody card stock, a double bow of gold Simply Elegant Trim (#155766),  and a few retired Gilded Gems complete the card.

Be sure and check out the TGIF Challenges Blog this week.  You are going to see a nice variety of favorites! 

Hope you have a great rest of your week!
--Sara Nell


Thursday, July 21, 2022

Snowflakes for Christmas in July--#tgifc377

It's Christmas in July over at TGIF Challenges this week, so I created a snowflake blizzard of joy for the Christmas season.  I imagine most of us need a reminder of cooler days to come right now--it is been HOT!


For my card, I used the Texture Chic bundle of products as well as a retired stamp set, Wrapped In Christmas (#153481), for my holiday greeting.  The background is a piece of the beautiful Texture Chic specialty designer series paper (#158808).  I took my color cues from the paper:  Soft Succulent, Evening Evergreen, Basic White and gold.  The Soft Succulent snowflakes and the greeting were stamped in VersaMark ink (#102283) and heat embossed with Gold Stampin' Emboss Powder (Metallics Collection, #155555).  The stamping and die cutting (except the greeting piece) were done with the Season of Chic Bundle (#158816; includes at 10% off the Season of Chic stamp set, #158810, and the Chic dies, #158816).  The greeting piece was die cut using a Stitched Rectangles die (#151820).

A soft succulent card base, Evening Evergreen layer and a splattering of Pearl Basic Jewels (#144219) complete the card.

Get inspired for holiday stamping over at the TGIF Challenges blog here.


Have a merry week!
--Sara Nell 


Wednesday, July 6, 2022

Sending Hugs--#tgifc375

This week's color challenge at TGIF Challenges is Flirty Flamingo, Blushing Bride and Soft Sea Foam.  It's a soft, pretty color scheme that I decided to play up by just adding white.   I started by using a printed Soft Sea Foam card base from the FREE (with qualifying purchase) Sale-a-Bration product choice, Pool Party & Soft Sea Foam cards & envelopes (#159940).  The printed design on the card base coordinates with the Splendid Day Suite in the July-December 2022 Mini Catalog, so I used the Splendid Thoughts stamp set (#159668) and Splendid Stems dies (#159676, bundled at 10% off with the stamp set, #159677) to create my card:

I stamped with VersaMark (#102283) and heat embossed the two leaf images from the stamp set with White Stampin' Emboss Powder (Basics collection, #155554), one on Flirty Flamingo card stock and the other on Blushing Bride card stock.  These were die cut using the coordinating dies. The small open leaf images were die cut out of Soft Sea Foam card stock.  These die cuts were arranged on a Basic White circle die cut with the Stylish Shapes dies (#159183), then this circle was layered over a Flirty Flamingo scalloped circle die cut using the Layering Circles dies (#151770).  The greeting was stamped in Flirty Flamingo and die cut using a banner die from the Stylish Shapes dies. 

A bow of Soft Sea Foam Seam Binding ribbon (#159680) and three white Classic Matte Dots (#158146) complete the card.

I love color challenges because you see so many different ways people use the colors to create great cards.  See all of the designs over at the TGIF Challenges Blog here.  


Have a great day!
--Sara Nell


Sunday, July 3, 2022

Creation Station July Blog Hop--The Great Outdoors


 Welcome to the July Creation Station Blog Hop!

So glad you are here.

We have a fun and wide-open theme hop today:  The Great Outdoors.  You are going to see a variety of projects today celebrating Summer in the Great Outdoors.  We hope you will follow along and hop with us by clicking on the "Next" link at the end of each post.  You'll be glad you did!


I am so inspired by the great outdoors, but I always find greatest peace in a colorful meadow.  Today, I created two different meadows--one filled with wildflowers and one a field of poppies.  Each meadow was framed in a shade of green (Soft Sea Foam and Garden Green) representing the outdoors. Each frame was stamped with its same color using images from the Painted Poppies stamp set (#151599) and die cut using the Stitched Rectangles dies (#151820).  The background of each meadow is a Balmy Blue sky created with the large splatter stamp in the Painted Poppies stamp set. The sentiment on each was stamped and die cut using a Tailor Made Tags die (#155563).  The card base on each is Basic White Thick card stock.


The wildflowers in this first card were stamped using the Dragonfly Garden stamp set (#154411) and Crumb Cake ink.  The wildflowers were colored with the following Stampin' Blends Combos:  Pale Papaya, Daffodil Delight, Tahitian Tide, Fresh Freesia, Soft Sea Foam and Granny Apple Green.  The sentiment is from the same stamp set and was stamped in Soft Suede ink.  The card was completed with a bow of Linen Thread (#104199) on the tag and some tiny Brushed Brass Butterflies (#158136).


The poppies on this card were stamped in Early Espresso ink and colored with Poppy Parade and Sweet Sorbet combo Stampin' Blends.  The greeting is from the Peaceful Moments stamp set (#151595) and was also stamped in Early Espresso.  The card was completed with a bit of gold Simply Elegant Trim (#155766) on the tag and a splattering of gold Brushed Metallic Adhesive-Backed Dots (#156506).

Hope you were inspired by my cards created with two of my old favorite stamp sets.  Now, let's get inspired by Denita's Great Outdoors favorites:


Have a wonderful weekend wherever in the outdoors you go.  Happy 4th to my U.S.A. friends: it's BBQ and/or beach time!
--Sara Nell


July Creation Station Blog Hop: Case The Catalog

  Hello!  Welcome to the Creation Station Blog Hop!  We are a team of Stampin' Up! Demonstrators from around the world who create a hop ...